Showing posts with label DIY. Show all posts

Thursday, April 18, 2013

DIY Lamps

Have you ever been on the hunt for a perfect lamp but you just cant find it? Well my bff Katherine has been hunting for weeks and weeks with no success. When I was in town last weekend we decided to screw it and just make one ourselves.  There are about a million ideas out there, but this is what we did. We were both thrilled with the outcome and how relatively easy it was!

via
Kat decided she wanted to use a clear glass vase and a white shade. She picked up 2 vases and lampshades from the thrift shop (not just for popping tags) for less than 10 bucks. Then we headed over to Home Depot for the lamp kits. Those were about $10 each, so $30 total for two one of a kind lamps. Not a bad deal.

So here's what we did.

 NOTE. This is what you do if you DON'T want to attempt to drill through glass. The cord runs along the side of the vase. 

Get yourself a sweet vase.


A 3-Way Socket


and a lamp cord (also, think about decorating your lamp cord for fun!)


Drill a hole in the side of the bottom of the lamp kit so you can run the cord through the side.The metal is about as thick as a coke can, so it's not too hard to drill through. We found it was most effective to drill 3 small holes right next to each other, then chisel between them to attempt to make your cord fit.  


Congratulations! Now that the hard part is over! Put the end of the cord through the hole. 


Then follow the directions on the lamp kit packet. Essentially tie this fancy knot and attach to the screws. 


Then stuff it all in there and secure the bottom. *Make sure the bottom is on straight or else the light will tilt.


Get yourself some gorilla glue and 3 1/2 inch washers. You will glue each of these together and to the base of the lamp kit. Take off the little screw on the side of the bottom cap the slide on the washers. This will create a flat surface to stabilize your lamp, and allows you to glue the vase to the light. Don't forget gorilla glue works better on a moist surface.


Since you can't really clamp it together, weigh the top down with a heavy book. 


After your glue dries (30-60 minutes) glue directly on to the base of your vase. Weigh the top down with a book and let the glue cure. *Gorilla glue foams up, so don't be alarmed. 


Then you're essentially done! Add a bulb and a shade then plug her in! 


So... what do y'all think? We were both totally obsessed with this project and began brainstorming endless ideas for lamps! Mason jars, wine bottles, those jars you use to store pasta! Plus the bottom of the lamp is the top of the vase, so it's open and you could potentially put something in there to display!

I think it's important to note that we used the kind of shade that is secured directly by the light bulb that way we didn't have to mess with harps.

This project is super easy, and the hardest part was really just drilling through the side of that metal cap.  I will say that if you are wanting to save money, a DIY lamp could be the way to go, but you have to be careful with your components. I mean if you pick up a vase for $20 and another $10 for a shade (both of which seem like reasonable prices to me), plus another $10 for the kit, you're suddenly out $40 for one lamp and 2 hours of your life. For that price you could probably find something you're happy with a Homegoods or something. But part of the fun is being able to say, "Look, I made this" and impressing all of your friends.

Now I'm so excited about this DIY project, and can't wait to get brainstorming on some fun ideas for my new place!

Monday, August 27, 2012

DIY Green Laundry Detergent

Happy Monday Folks!

I just wanted to start off the week by thanking all of you who commented on my politics post last week. Politics is something I really care about, so I'm excited that y'all are eager to read my opinions. Your sweet comments really meant a lot to me, so thank you.

On a completely different note, it recently occurred to me the other day that I haven't shared one of my favorite DIY's that I use religiously. I make my own laundry detergent, and it's awesome.

I saw this on a blog somewhere and the girl just raved about how much money she saved and how awesome it was, etc. So I thought, "hey, why not give it a shot? I like saving money." So I went for it. This is hands down the best laundry detergent I've ever used (I started doing my own laundry at age 12 so I've had quite a bit of experience for my young age).

There are so many "feel good" benefits of making your own laundry detergent. It's "green" because this detergent is low suds so it doesn't pollute the water, and is safe for new front load washers. You aren't wasting water because it's powdered. You aren't wasting money on packaging, nor are you generating anywhere near the trash because you have to buy the ingredients so infrequently. Plus this doesn't have any heavy fragrances or dyes, so it's safe for sensitive skin.

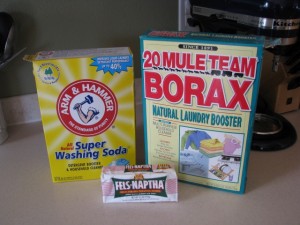
You only need three things to make it. Borax, Washing Soda and Soap (try fels-naptha)


Borax ($3.38) (.42 per batch)

Washing Soda ($3.29) (.48 per batch)

Fel-Naptha Soap ($.99 per batch) (grate this with a cheese grater, or in a food processor)

Find a container that holds at least 4 cups (I used a 32oz yogurt container) Add a cup of Borax, a cup of washing soda and your fels-naptha. Shake it up until the three ingredients are relatively distributed. You'll only use 1 tbsp per load (medium size loads, use 1-2 tbsp for larger loads). That means that 1 batch will make 64 loads, ONLY 2.9 cents per load!!!! I mean what? Woah.

Powder Tide is $.44 a load;  Liquid Tide is $.24 a load. Not that I do a ton of laundry, but everyone loves a savings right?

Seriously I can't rave about this enough. While the soap grating is a slightly labor intensive process, I think it's totally worth it!

Do y'all have any good DIY's? Have you tried this? I'd love to know!

Tuesday, June 12, 2012

{Beauty Tuesday} DIY Body Scrubs

First of all I want to say thank you to the wonderful Julie I just won a sweet giveaway, and I'm so excited for my sparkly earrings to get here :) Thanks love!

It's summer time and we all want that glow that comes from spending the day in the sand and surf. Since I'm beyond fair skinned I've tried to re-create the look, just from my bathroom. First I started off by thinking about what creates that glow exactly? my answer was salt, sand and sun. So what better than a DIY salt scrub and a little sunless tanner to get the job done? This is a two part project. Lets start off with the salt scrub.

I just kind of winged it, and now I'm completely obsessed and will be making these like crazy (slash I was BEYOND crazy to pay so much for those fancy scrubs from bath and body works). You need to just keep in mind this basic ratio. 2 parts grit (salt/sugar) 1 part oil.

I used a combo of sea salt, sugar and epsom salts. Each of have a slightly different size so my thought was they would combine to make a more efficient scrub. The epsom salt is definitely larger than my sea salt, so it wasn't the most gentle scrub (but I liked it). The sugar and the salt I used were pretty much the same size, but I felt that the salt dissolved a little faster than the sugar.

To mix up the scrub I simply filled a bowl with equal parts sugar, sea and epsom salts (about 1 cup). Then I added 1/2 a cup of olive oil. stir together and maybe add your favorite essential oil (I'm definitively thinking lavender, maybe lemon? the possibilities are endless). Stir it all together. bottle. and your ready to go.
via

Seriously y'all. that's its. so easy. and I was REALLY happy with my results.

*I will note that if you do not use enough oil, shaving AFTER exfoliating could potentially be painful. I say this from experience (round 2 with more oil went MUCH better)

 So now you're clean shaven on your legs. They're glowing with baby smooth skin. Now apply your favorite sunless tanner. I'm still just getting into the world of sunless tanner but I am loving this one in particular

Sublime Bronze

This one goes on dark, so you can see where you're putting it. This goes for any sunless tanning lotion but BE CAREFUL with how much your using. A little really goes a long way. You can always do two coats if  you're not happy with the results. I like this one because it doesn't get you super dark on the first application, though it's certainly build-able. One thing I don't like it that it has glitter in it. It's kind of fun for going out, but I'm more of a shower at night, sunless tan then rinse off in the morning before work. The glitter doesn't really come off that first shower though. Not so work appropriate. It's subtle enough that I'm probably the only one that notices, but still.

So there you go. Look like you just stepped off the beach (well in my case I never look like that when I get off the beach, HELLO SUNBURN) but save the cancer causing UV exposure for another time.

Now I have a question for y'all. I NEED sunless tanner recommendations! I don't like being super dark, but the Jergens daily lotion isn't fast enough for me. I'm a klutz with the sprays, so lotions or some other rub on products only please! What sunless tanners do you love/hate?

Saturday, March 31, 2012

DIY: Nightstand Revamp


I'm not sure if I've mentioned it before, but I moved up to DC with only 2 suitcases and have eventually brought the rest of my stuff (as long as it fit my my Jetta) so I have been lacking furniture for the past year. I spent 4 months sleeping on an air mattress! I know. But now that I have a real bed, I needed a real nightstand. After numerous trips to ikea, target, and a few more "expensive" furniture shops I decided I needed to DIY something to get the look I wanted. I trolled craigslist for a few days, and found this baby for a STEAL.  
What do you think? It's a beautiful solid wood piece, and I wanted something basic (and small) for my bedside table. I love that it has this cubby to display books, baskets, trinkets or whatever else I would want, and still has a drawer (which is currently housing lots of papers). So I thought about this for a while... How should I paint it? My room is painted grey with white bedding and pink curtains. Since I'm obsessed with my grey walls, and I love the monochromatic look I decided to save some $$ and paint it the same color as my walls. I also I wanted something that would blend nicely, but would still work with a new color scheme should I chose to change it in the future. I also decided to tackle a stencil. I realize it was a tad ambitious as my first project, but hey when I was 8 my mom and I re-did an antique dresser for my room. We painted it white with an antique pink for the handles. THEN when I was 14 we spray painted the handles silver... so it's not exactly my first attempt at re-doing antique furniture. I attempted to take pictures all the way through, but I missed a few steps so I apologize and please just use your imagination.

Once I settled on a color scheme it was time to execute it. But... one problem. I live in a small apartment, no porch, no garage, nothing but a sidewalk to paint on. So spray paint was out. Then I decided I didn't want to invest in any industrial sanders, so what to do? Oil-based primer my friend. Yes. Not only didn't I not have to sand the piece, but the primer was so thick the application with a brush created these lines similar to wood grain. Love it.
One coat wasn't quite enough to cover the dark color, and while I'm sure it would have been fine, it really didn't require that much paint, so here's coat #2.
Background information. I have a black and white damask bedspread. I love all things black and white damask. like... LOVE. I was going to attempt a damask flower on top, but couldn't find a good stencil and decided it was too difficult. So, what to do? After searching blogs and blogs for stencils, I finally decided on a fleur de lis. I work for a Louisiana company now, so why not? Let me tell you, thank god I did something simple, because this part was HORRIBLE. as opposed to creating a stencil, I simply cut out the shape, traced it, then taped over that (the worst part), then painted over the whole thing, peel off the tape. Done. Thankfully it turned out well, and I only had to do some minor touch ups.

Time for the big reveal... are you ready?

Yay!!!!

So cute right? I am planning on spray painting the handle white, but haven't gotten a chance to get back to home depot. What do you think???? I have to say, I'm pretty impressed with myself.

Monday, March 26, 2012

{DIY Project} Bottle Cap Art

Good Morning, Happy Monday. Again. This past weekend was one of those wonderful weekends were I slept in, didn't really do anything of note, and just relaxed. It was glorious, but I feel rundown and tired this morning, and even two cups of coffee isn't helping. annoying.
Friday night we had a few friends over to watch basketball. I am picked the Kentucky Wildcats (go SEC!) to win over UNC by 4, but UNC is out now. boo. I went to bed at 11. It was amazing.

Saturday I attempted to get up early and go to Yoga, but it was raining and grey and my bed was so warm and I really just wanted to sleep... so... I stayed in bed until 11. Then I got up and let the spring cleaning began! I have to say, we were moderately successful, but we may have to do a spring cleaning round 2. We mopped, Windex'd, dusted, rearranged and threw away a lot of random crap, but I still feel like our house is cluttered. I guess I'm just going to have to deal since I have roommates, but all the STUFF everywhere just stresses me out. Do y'all ever get that way? My roommate KJ and I have a theory that our stress stems from the "study abroad" syndrome, aka, when you have to pack your entire life into 1 suitcase for 4 months, you learn how to not need all the "stuff" and it stresses you out to hold on to unnecessary items because they're only going to slow you down when you move on. But I digress.

After a few hours of cleaning we reached a stopping point and I decided it was finally time to tackle a DIY project 9+ months in the making. I present to you bottle cap art:


Last year I made some wine cork initials (I'll show you that another time). Since we are three young ladies who like to partake in a cocktail or two every now and again we have these bottle caps that just show up on our bar. Being the crafty person I am I got to thinking what I can do with them... First I was going to flatten them and cover our freecycled coffee table, but I tried hammering 1 bottle cap and decided it was more work than it was worth. Then I was going to make a wind chime or something like that but again... too much effort. So this was the next step. Glue a bunch of bottle caps to a board and put it in a frame. PERFECT! I am beyond thrilled about it and love how colorful and fun it is.


What do you think of the final product? I am obsessed with it. For real. It was so easy to make, but took a while to generate all the bottle caps, but if you're looking for some fun DIY art I highly recommend it. PLUS besides all the beer, this was a really inexpensive project to make. Here's what I used
  • Find a frame you like (mine was from Michael's AS-IS frame section) $8
  • 1 sheet of foam board cut to size, $2.50
  • Spray paint the foam board (I used some grey paint I had on hand) free
  • Put your bottle caps down and decide if you want to use any kind of pattern (I went for a somewhat random color pattern)
  • Put hot glue on the rim of the bottle cap and start gluing in one corner and work your way out
  • Have fun with it!
Hope y'all like this, it was really fun to put together and I adore how it looks in my kitchen with my other alcohol themed art. :)

©2013 Design by Katelyn Brooke Designs